How to Locate Coil Voltage on Telemecanique Contactor: A Step-by-Step Guide
 Telemecanique contactors (Schneider now) are widely used in electrical systems for controlling electrical circuits.
Understanding how to locate the coil voltage on a Telemecanique contactor is crucial for proper installation and maintenance.
The coil voltage determines the electrical input required to energize the contactor and control the switching of the electrical circuit.
This article provides a comprehensive guide on how to locate the coil voltage on Telemecanique contactors and why it is important for your electrical system.
What is a Telemecanique Contactor?
A contactor is an electrical switch used for switching an electrical circuit on or off. It is controlled by an electromagnetic coil, which is energized to close the contacts and allow current to flow. Telemecanique, a brand of Schneider Electric, produces high-quality contactors used in various industrial and commercial applications.
The contactor consists of two primary components:
-
Coil – The electromagnet that creates a magnetic field when energized, closing or opening the contacts.
-
Contacts – These are the physical switches that control the flow of electricity.
The coil voltage, also known as the operating voltage, is a critical factor for the proper functioning of the contactor.
Why is the Coil Voltage Important?
The coil voltage determines the amount of voltage needed to energize the contactor. If the voltage applied to the coil is too low or too high, the contactor may not function properly. Using the wrong coil voltage could cause:
-
The contactor to fail to activate or deactivate.
-
Excessive wear on the contactor over time.
-
Potential damage to the electrical system or components.
To ensure safe and reliable operation, always verify the correct coil voltage for the Telemecanique contactor before installation.
Step-by-Step Guide to Locating Coil Voltage on Telemecanique Contactors
Here’s how you can locate the coil voltage on a Telemecanique contactor:
-
Check the Model Number on the Contactor
Every Telemecanique contactor has a model number that can be used to identify key specifications, including the coil voltage. The model number is typically located on the front or side of the contactor. Look for a label or nameplate that includes the model number, which usually starts with a prefix like LC1 or LC2. -
Refer to the Product Datasheet or Manual
Once you have the model number, refer to the product datasheet or user manual. Telemecanique provides detailed documentation for each model that includes the coil voltage specification. The datasheet will list the range of voltages that the coil can operate on, such as 24V, 110V, 230V, 400V, and so on. Be sure to cross-check the model number with the datasheet to ensure accuracy. -
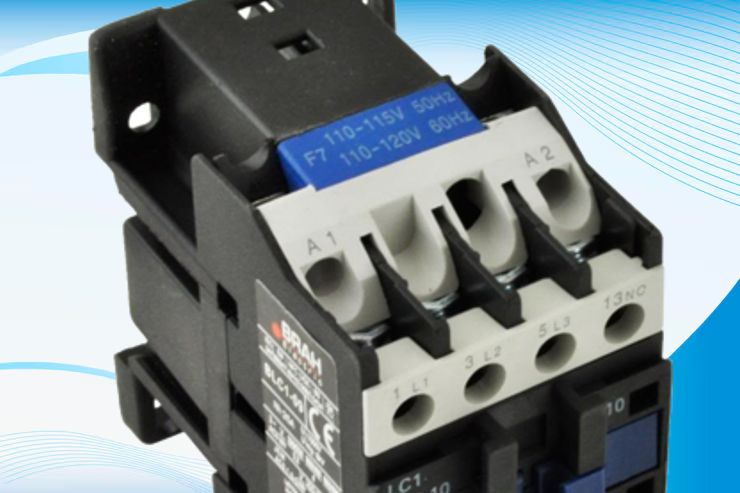
Look for Coil Voltage Information on the Label
Some Telemecanique contactors have the coil voltage printed directly on the label or nameplate of the unit. The label usually includes additional information such as the contactor’s current rating, frequency, and other technical specifications. Coil voltage information is often presented in the form of a numerical value (e.g., 24V AC or 110V DC). -
Use the Coil Voltage Selector Code
Telemecanique contactors may have a specific "selector code" that indicates the coil voltage. This code can be found on the nameplate or datasheet and corresponds to different operating voltages. For example:-
A code 110 could indicate a 110V coil voltage.
-
A code 220 could indicate a 220V coil voltage.
This code can be cross-referenced with the Telemecanique catalog or manual to confirm the exact coil voltage.
-
-
Check the Coil Terminals
Some contactors may have labels near the coil terminals indicating the voltage rating. These terminals are typically marked as A1 and A2 for AC coils or B1 and B2 for DC coils. While this method may not always provide the exact voltage, it can give a clue about the type of coil voltage used. -
Measure the Coil Voltage Using a Multimeter
If you cannot find the coil voltage from the datasheet or nameplate, you can use a multimeter to measure the voltage across the coil terminals (A1 and A2). To do this safely:-
Turn off the power supply.
-
Use a multimeter to check the resistance across the coil terminals.
-
The resistance value will give an indication of the coil's voltage class. However, this method requires advanced knowledge of electrical systems and should only be attempted by qualified personnel.
-
Common Coil Voltages for Telemecanique Contactors
Telemecanique offers contactors with various coil voltages depending on the intended application. Common coil voltages include:
-
24V AC/DC – Often used in low-voltage systems.
-
48V AC/DC – Common in industrial automation.
-
110V AC/DC – Frequently found in control systems and smaller motors.
-
220V AC/DC – Used in large industrial systems and motors.
-
380V-415V AC – Standard for high-power industrial applications.
Always confirm the coil voltage to ensure that the contactor matches the power supply and control system voltage in your setup.
Tips for Choosing the Right Coil Voltage
-
Match the Control Circuit Voltage
Always choose a coil voltage that matches your control circuit's voltage. For example, if your control system operates at 110V, select a Telemecanique contactor with a 110V coil. -
Consider the Type of Power Supply
Ensure that the coil voltage corresponds to either AC or DC power. Telemecanique contactors offer both AC and DC coil options, and the voltage type must match the power supply type. -
Ensure Correct Frequency Rating
For AC coils, it’s important to verify that the coil voltage also matches the frequency of your system (e.g., 50Hz or 60Hz). -
Use Proper Safety Precautions
Always de-energize the circuit before working with contactors. Use insulated tools and follow proper lockout/tagout procedures to prevent electrical hazards.
Conclusion
Locating the coil voltage on a Telemecanique contactor is a simple yet essential task for ensuring the safe and efficient operation of your electrical system. By checking the model number, consulting the datasheet, and verifying the voltage on the nameplate, you can easily identify the correct coil voltage. This helps prevent installation errors and improves the overall performance of your system. Always refer to the manufacturer’s specifications and ensure that the coil voltage matches your control circuit's voltage for optimal operation.
By following these steps and considering the tips provided, you'll be well-equipped to work with Telemecanique contactors and maintain a safe electrical environment.