? How to Assemble and Disassemble a Telemecanique XB4 Push Button – Step-by-Step Guide
The Telemecanique Harmony XB4 push button range is known for its reliability, modular design, and ease of installation.
Whether you're assembling a simple start/stop station or a complex control panel, the XB4 series allows you to build custom push button configurations using standardized components.
In this guide, we’ll walk you through:
-
How to assemble a Telemecanique XB4 push button
-
How to disassemble it safely
-
Common components used in the XB4-ZB4 Harmony range
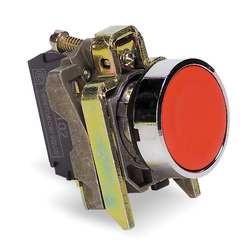
? Understanding the Telemecanique XB4 Push Button Components
Before assembling your push button, it helps to understand the core elements. Every Telemecanique XB4 button typically consists of:
Core Component Parts:
-
Actuator / Button Head
-
Flush Push Buttons:
-
ZB4BA1 (White)
-
ZB4BA2 (Black)
-
ZB4BA4 (Red)
-
ZB4BA5 (Yellow)
-
ZB4BA6 (Blue)
-
ZB4BA8 (Grey)
-
-
E-stop Button: ZB4BS844
-
Selector Switches: ZB4BD2, ZB4BD3
-
2-Position Selector (Removable both positions): ZB4BG4
-
-
Carrier / Mounting Collar
-
Example: ZB4BZ009
-
-
Contact Blocks
-
Normally Open (NO): ZBE101
-
Normally Closed (NC): ZBE102
-
These modular parts allow for full flexibility in configuring your push button control systems.
? How to Assemble a Telemecanique XB4 Push Button
You’ll need:
-
1x Button head (actuator)
-
1x Carrier (mounting collar)
-
1x or more Contact blocks (NO/NC as required)
Step-by-Step Assembly Instructions:
1. Attach the Button to the Carrier
-
Look for the arrow on the side of the actuator (button head) — it should be pointing downward.
-
Align this with the upward arrow on the front of the carrier.
-
Slide the button into the carrier until it clicks securely into place.
2. Install the Contact Blocks
-
Turn the carrier around to access the rear. You'll notice one side is slightly raised—this helps orient the contacts.
-
Take your contact block (ZBE101 or ZBE102) and align:
-
The plastic lip on the contact with the higher side of the carrier.
-
The metal connector on the contact with the indentations on the carrier.
-
-
Push the contact block into position. You can insert up to three contacts side-by-side, and even stack them vertically using the appropriate mounting configuration.
✔️ Once the contacts are attached, your Telemecanique XB4 push button is ready to install in your control panel.
? How to Disassemble a Telemecanique XB4 Push Button
Need to change contacts or replace a button? Here's how to safely take it apart.
Step-by-Step Disassembly Instructions:
1. Remove the Contact Blocks
-
Locate the arrow on the back of the carrier, near the contact area.
-
Insert a flat-head screwdriver under the contact block where it clips onto the carrier.
-
Gently pry the contact off—it should come away with minimal force.
2. Release the Button Head
-
On the right-hand side of the carrier (looking at it from the front), you’ll find a metal release lever.
-
Pull this lever outwards to disengage the actuator from the carrier.
-
Slide the button head out.
✔️ Your push button is now fully disassembled and ready for maintenance, reconfiguration, or replacement.
⚙️ Telemecanique XB4 Push Button Range – Fully Modular & Easy to Use
The Harmony XB4 series makes it easy to create your own push button solutions. With robust construction, IP-rated protection, and a wide variety of actuators and contact blocks, it’s no surprise that this range is widely used across industrial automation and control panel applications.
? Looking for Genuine Telemecanique XB4 Parts?
At Electroquip, we stock:
-
All major Telemecanique XB4 components
-
Full push button assemblies
-
Replacement ZBE101/ZBE102 contact blocks
-
E-stop and selector switches
We offer:
-
✅ Same-day dispatch available
-
✅ Expert technical support
-
✅ Hot-swap alternatives if you're in a hurry
? Contact us today to get the right parts for your application.